Learn the powerful enterprise adaptable database:

Getting Started With ADABAS & Natural

Showing posts with label cordova. Show all posts

Wednesday, July 12, 2017

209 IonicV1 Creator Ionic Native Camera


.
209 IonicV1 Creator Ionic Native Camera


1. Create a project.

Eg IonNatCam1


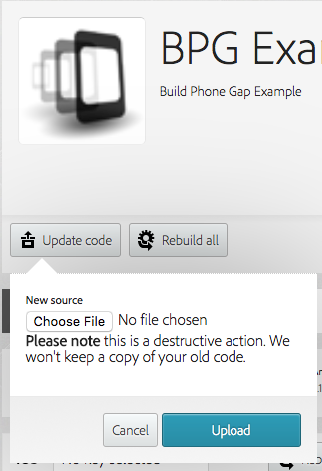
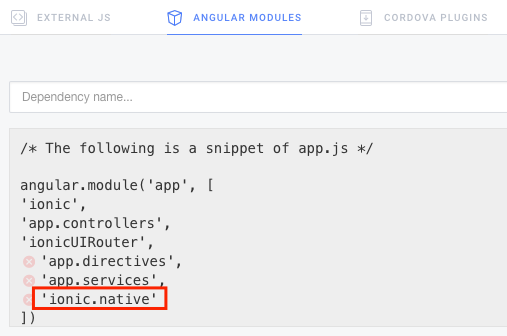
2. Add ionic native to the project.

Get ionic native v.2.0.9 codes from here (github) or here (gdrive)
Create a new JS file.
Paste the codes to JS File.
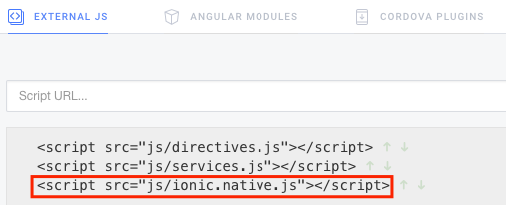
Add the module ionic.native to angular modules.

3. Add Cordova Plugin.


cordova-plugin-camera

4. Add Components to Layout

Button Bar (by default, it consists of three buttons so delete the third button).
Image.
Upload the following imageplaceholder.
(blankimage.png)
Set the Directive for the Button 1 as follows:
ng-click, captureImage()
Set the Directive for the Button 2 as follows:
ng-click, openImage()
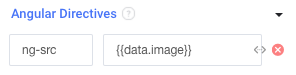
Set the Directive for the image component as follows:
ng-src, {{data.image}}

5. Add test codes to Controller.

function ($scope, $stateParams) {
    $scope.data={image:"https://upload.wikimedia.org/wikipedia/commons/thumb/e/e0/SNice.svg/220px-SNice.svg.png"}
}
Outcome.
(The imageplaceholder is replaced by a smiley)

6. Add camera codes to Controller.

function ($scope, $stateParams, $cordovaCamera) {
   $scope.data={image:"https://upload.wikimedia.org/wikipedia/commons/thumb/e/e0/SNice.svg/220px-SNice.svg.png"}


$scope.captureImage=function(){
 
     document.addEventListener("deviceready", function () {

   var options = {
     quality: 50,
     destinationType: Camera.DestinationType.DATA_URL,
     sourceType: Camera.PictureSourceType.CAMERA,
     allowEdit: true,
     encodingType: Camera.EncodingType.JPEG,
     targetWidth: 100,
     targetHeight: 100,
     saveToPhotoAlbum: false,
          correctOrientation:true
   };

   $cordovaCamera.getPicture(options).then(function(imageData) {

     $scope.data.image= "data:image/jpeg;base64," + imageData;
   }, function(err) {
     // error
   });

 }, false);
}


$scope.openImage=function(){
 document.addEventListener("deviceready", function () {

   var options = {
       // Some common settings are 20, 50, and 100
       quality: 50,
       destinationType: Camera.DestinationType.FILE_URI,
       // In this app, dynamically set the picture source, Camera or photo gallery
       sourceType: Camera.PictureSourceType.SAVEDPHOTOALBUM,
       encodingType: Camera.EncodingType.JPEG,
       mediaType: Camera.MediaType.PICTURE,
       allowEdit: true,
       correctOrientation: true  //Corrects Android orientation quirks
   }

   $cordovaCamera.getPicture(options).then(function(imageURI) {

      $scope.data.image = imageURI;
   }, function(err) {
     // error
   });


   //$cordovaCamera.cleanup().then(); /* only for FILE_URI*/

 }, false);

}

}
Reference:

.

200 IonicV1 Creator and Cordova Plugins


.

200 IonicV1 Creator and Cordova Plugins

Accessing native device features from within your app (the camera, for example) requires using Cordova Plugins. This short guide will teach you how to add these plugins in Creator, and then use those plugins with a JS library called Ionic Native.

1. Include the Ionic Native JavaScript In Your App

Or from here.
Then, create a new JS file ie ionic.native.min.js and paste the contents.

2. Add "ionic.native" as an Angular Module

Click on "Code Settings" from the top bar of the code editor, then add "ionic.native"

3. Add Some Cordova Plugins to Your App

For a full listing of Cordova Plugins, see here: https://cordova.apache.org/plugins/
Official Cordova Plugins will be name "cordova-plugin-[something]". For example, "cordova-plugin-camera". To add a plugin to your app, click the Cordova Plugins tab from Code Settings.
You will notice that certain plugins will be pre-populated, because they are always included in your project.

Important

Adding plugins here only effects your app if you package from Creator. It will have no effect when previewing your app in the browser, or on Creator Mobile, or exporting a ZIP file.

4. Now You Can Use the Plugin In Your Page Controllers

Ionic Native works as a stand-in for ngCordova (which is the predecessor for Ionic Native). In many cases, the usage is identical. Even though we are using Ionic Native, you can refer to ngCordova for usage examples: http://ngcordova.com/docs/plugins/camera/
As a rule of thumb: take the ES6 class name of the plugin and add $cordova to get the service name. For example, Geolocation would be $cordovaGeolocation, and Camera will be $cordovaCamera
// Example: this would be the constructor function
// for a Page/Controller in your Creator app

function($scope, $cordovaCamera) {
 $scope.takePicture = function() {
   $cordovaCamera.getPicture(opts).then(function(p) {
     // do something with the results
     // you will sometimes need to wrap $scope updates in $apply
     $scope.$apply(function() {
       $scope.results = p;
     });
   }, function(err) {
           // error handling
   });
 };

5. Writing Services And Directives That Use Cordova Plugins

If you write your own Angular services or directives that will use a Cordova Plugin, the syntax for injecting the plugins will be slightly different. For example:
angular.module('app.services', [])

.service('BlankService', ['$cordovaCamera', 'SomethingElse', function($cordovaCamera, SomethingElse){

}]);

6. Testing Your Apps That Use Cordova Plugins

Cordova Plugins do not run in the browser, and are not added when previewing on Creator Mobile or in ZIP exports.
In order to test the functionality of code you write using Ionic Native / Cordova Plugins, you have two options:
Option 1:
Package your app from within Creator. Your APK/IPA file will be e-mailed to you, and you will need to run your app on your actual device to test native functionality.
Option 2:
(This requires a local Ionic development environment)
Export your app as a ZIP file. Once you have your ZIP file, you will need to start a new Ionic project on your local computer, using the Ionic CLI.
ionic start myApp
This will create a new directory with a starter Ionic app. Then, copy/paste the contents of your ZIP file into the www/ folder of the app created above. Now you have a replica of your Creator app on your local computer.
Next, from the command line, you will need to install each Cordova Plugin you added from STEP 3 of this guide. The command is below.
cordova plugin add cordova-plugin-camera
Now you can run this app on a device:
ionic run ios
ionic run android

REFERENCE


Friday, May 12, 2017

209 Build.PhoneGap.com with Cordova File


.
209 Build.PhoneGap.com with Cordova File

1) Check Version

As at 2017-11-14
PhoneGap Version:
PhoneGap (iOS / Android / Windows)
cli-6.5.0 (4.3.1 / 6.1.2 / 4.4.3)
Plugin Version:
<plugin name="cordova-plugin-file" spec="4.3.3" />

2) Startup Files

config.xml
<?xml version='1.0' encoding='utf-8'?>
<widget id="com.notarazi.bpg" version="1.0.0" xmlns="http://www.w3.org/ns/widgets" xmlns:cdv="http://cordova.apache.org/ns/1.0">
  <name>BPG </name>
  <description>
      Build Phone Gap Example
  </description>
  <author email="notarazi@gmail.com" href="http://fb.me/notarazi.blogs">
      Notarazi Team
  </author>
  <content src="index.html" />
  <access origin="*" />
  <allow-intent href="http://*/*" />
  <allow-intent href="https://*/*" />
  <allow-intent href="tel:*" />
  <allow-intent href="sms:*" />
  <allow-intent href="mailto:*" />
  <allow-intent href="geo:*" />
  <platform name="android">
      <allow-intent href="market:*" />
  </platform>
  <platform name="ios">
      <allow-intent href="itms:*" />
      <allow-intent href="itms-apps:*" />
  </platform>
  <engine name="android" spec="^6.2.3" />
  <engine name="ios" spec="^4.4.0" />
<plugin name="cordova-plugin-file" spec="4.3.3" />
</widget>
index.html
<!DOCTYPE html>
<html>
 <head>
   <title>BPG Example</title>
   <script type="text/javascript" charset="utf-8" src="cordova.js"></script>
   <script type="text/javascript" charset="utf-8">
   document.addEventListener("deviceready", onDeviceReady, false);
   function onDeviceReady() {
    console.log(
cordova.file);
     document.getElementById('appmessage').innerHTML=
            JSON.stringify(cordova.file);
   }
   </script>
 </head>
 <body>
  <div id='appmessage'style=' width:200px;word-wrap: break-word;'>
   ...
   </div>
 </body>
</html>

3) Zip, Upload and Build the project

4) Test Output

Console Output
Screen Output

Download

Reference


.

208 Build.PhoneGap.com with Cordova Dialogs


.
208 Build.PhoneGap.com with Cordova Dialogs

1) Check Version

As at 2017-11-14
PhoneGap Version:
PhoneGap (iOS / Android / Windows)
cli-6.5.0 (4.3.1 / 6.1.2 / 4.4.3)
Plugin Version:
<plugin name="cordova-plugin-dialogs" spec="1.3.4" />

2) Startup Files

config.xml
<?xml version='1.0' encoding='utf-8'?>
<widget id="com.notarazi.bpg" version="1.0.0" xmlns="http://www.w3.org/ns/widgets" xmlns:cdv="http://cordova.apache.org/ns/1.0">
  <name>BPG </name>
  <description>
      Build Phone Gap Example
  </description>
  <author email="notarazi@gmail.com" href="http://fb.me/notarazi.blogs">
      Notarazi Team
  </author>
  <content src="index.html" />
  <access origin="*" />
  <allow-intent href="http://*/*" />
  <allow-intent href="https://*/*" />
  <allow-intent href="tel:*" />
  <allow-intent href="sms:*" />
  <allow-intent href="mailto:*" />
  <allow-intent href="geo:*" />
  <platform name="android">
      <allow-intent href="market:*" />
  </platform>
  <platform name="ios">
      <allow-intent href="itms:*" />
      <allow-intent href="itms-apps:*" />
  </platform>
  <engine name="android" spec="^6.2.3" />
  <engine name="ios" spec="^4.4.0" />
<plugin name="cordova-plugin-dialogs" spec="1.3.4" />
</widget>
index.html
<!DOCTYPE html>
<html>
 <head>
   <title>BPG Example</title>
   <script type="text/javascript" charset="utf-8" src="cordova.js"></script>
   <script type="text/javascript" charset="utf-8">
   document.addEventListener("deviceready", onDeviceReady, false);
   function onDeviceReady() {
    console.log(navigator.notification);
     document.getElementById('appmessage').innerHTML= JSON.stringify(navigator.notification);

   }
   </script>
 </head>
 <body>
  <div id='appmessage'style=' width:200px;word-wrap: break-word;'>
   ...
   </div>
 </body>
</html>

3) Zip, Upload and Build the project

4) Test Output

Console Output

Download

Reference


.

207 Build.PhoneGap.com with Cordova Device Orientation


.
207 Build.PhoneGap.com with Cordova Device Orientation

1) Check Version

As at 2017-11-14
PhoneGap Version:
PhoneGap (iOS / Android / Windows)
cli-6.5.0 (4.3.1 / 6.1.2 / 4.4.3)
Plugin Version:
<plugin name="cordova-plugin-device-orientation" spec="2.0.0" />

2) Startup Files

config.xml
<?xml version='1.0' encoding='utf-8'?>
<widget id="com.notarazi.bpg" version="1.0.0" xmlns="http://www.w3.org/ns/widgets" xmlns:cdv="http://cordova.apache.org/ns/1.0">
  <name>BPG </name>
  <description>
      Build Phone Gap Example
  </description>
  <author email="notarazi@gmail.com" href="http://fb.me/notarazi.blogs">
      Notarazi Team
  </author>
  <content src="index.html" />
  <access origin="*" />
  <allow-intent href="http://*/*" />
  <allow-intent href="https://*/*" />
  <allow-intent href="tel:*" />
  <allow-intent href="sms:*" />
  <allow-intent href="mailto:*" />
  <allow-intent href="geo:*" />
  <platform name="android">
      <allow-intent href="market:*" />
  </platform>
  <platform name="ios">
      <allow-intent href="itms:*" />
      <allow-intent href="itms-apps:*" />
  </platform>
  <engine name="android" spec="^6.2.3" />
  <engine name="ios" spec="^4.4.0" />
<plugin name="cordova-plugin-device-orientation" spec="2.0.0" />
</widget>
index.html
<!DOCTYPE html>
<html>
 <head>
   <title>BPG Example</title>
   <script type="text/javascript" charset="utf-8" src="cordova.js"></script>
   <script type="text/javascript" charset="utf-8">
   document.addEventListener("deviceready", onDeviceReady, false);
   function onDeviceReady() {
    console.log(navigator.compass);
     document.getElementById('appmessage').innerHTML= JSON.stringify(
navigator.compass);

   }
   </script>
 </head>
 <body>
  <div id='appmessage'style=' width:200px;word-wrap: break-word;'>
   ...
   </div>
 </body>
</html>

3) Zip, Upload and Build the project

4) Test Output

Console Output

Download

Reference


.