Learn the powerful enterprise adaptable database:

Getting Started With ADABAS & Natural

Saturday, September 2, 2017

Getting Started With Ionic 3


.

Getting Started With Ionic 3-Installing Ionic


Ionic apps are created and developed primarily through the Ionic command line utility (the “CLI”), and use Cordova to build and deploy as a native app. This means we need to install a few utilities to get developing.

1. Ionic CLI and Cordova


To create Ionic projects, you’ll need to install the latest version of the CLI and Cordova. Before you do that, you’ll need a recent version of Node.js. Download the installer for Node.js 6 or greater and then proceed to install the Ionic CLI and Cordova for native app development:

$ npm install -g ionic cordova

You may need to add “sudo” in front of these commands to install the utilities globally

2. Start Ionic Project


Once that’s done, create your first Ionic app:

$ ionic start cutePuppyPics


Add –-type ionic1 if you’d like to use Ionic 1.
ie $ ionic start cutePuppyPics --type ionic1


3. Test Ionic Project In Browser


To run your app, cd into the directory that was created and then run the ionic serve command to test your app right in the browser!

$ cd cutePuppyPics

$ ionic serve

4. Try on Android

ionic cordova run android --device

5. Try on iOS

ionic cordova run ios --device

You may get an error such as

An error occurred while running cordova run ios --device (exit code 1).

Try running without device (emulator)

ionic cordova run ios

refer stackflow discussion at https://stackoverflow.com/questions/44224573/an-error-occurred-when-i-was-running-ionic-cordova-platform-add-ios .


TRY A FULL DEMO: http://coenraets.org/blog/2017/04/dreamhouse-sample-application-ionic3-angular4/

STEP-BY-STEP TUTORIAL:
https://ionicframework.com/docs/intro/tutorial/
https://www.djamware.com/post-sub-category/5845691a80aca7763489d872/ionic-framework
https://javebratt.com/tutorials/ionic/
https://www.joshmorony.com/?s=ionic+3
http://www.9lessons.info/search/label/ionic%202
https://www.techiediaries.com/learn-ionic-study-guide/


REFERENCE: https://ionicframework.com/docs/intro/installation/

Saturday, August 12, 2017

Ionic V1 Project My Club

This tutorial creates Firebase Cloud Function to automatically create a User Profile record for a new user,

1) Run terminal command to init project and edit function codes
2) edit front-end codes 201708, 20170812, ionic-v1, firebase

Thursday, August 3, 2017

TypeScript Online Editor


.
You can practice TypeScript using http://www.typescriptlang.org/play/.

Or, you can try developing TypeScript application using https://codepen.io.


Wednesday, August 2, 2017

What is TypeScript?


.
The following article provides the explanation.
.

What is TypeScript?

By definition, “TypeScript is JavaScript for application-scale development.”
TypeScript is a strongly typed, object oriented, compiled language. It was designed by Anders Hejlsberg (designer of C#) at Microsoft. TypeScript is both a language and a set of tools. TypeScript is a typed superset of JavaScript compiled to JavaScript. In other words, TypeScript is JavaScript plus some additional features.
TypeScript Figure

Features of TypeScript

TypeScript is just JavaScript. TypeScript starts with JavaScript and ends with JavaScript. Typescript adopts the basic building blocks of your program from JavaScript. Hence, you only need to know JavaScript to use TypeScript. All TypeScript code is converted into its JavaScript equivalent for the purpose of execution.
TypeScript supports other JS libraries. Compiled TypeScript can be consumed from any JavaScript code. TypeScript-generated JavaScript can reuse all of the existing JavaScript frameworks, tools, and libraries.
JavaScript is TypeScript. This means that any valid .js file can be renamed to .ts and compiled with other TypeScript files.
TypeScript is portable. TypeScript is portable across browsers, devices, and operating systems. It can run on any environment that JavaScript runs on. Unlike its counterparts, TypeScript doesn’t need a dedicated VM or a specific runtime environment to execute.

TypeScript and ECMAScript

The ECMAScript specification is a standardized specification of a scripting language. There are six editions of ECMA-262 published. Version 6 of the standard is codenamed "Harmony". TypeScript is aligned with the ECMAScript6 specification.
TypeScript and ECMAScript
TypeScript adopts its basic language features from the ECMAScript5 specification, i.e., the official specification for JavaScript. TypeScript language features like Modules and class-based orientation are in line with the EcmaScript 6 specification. Additionally, TypeScript also embraces features like generics and type annotations that aren’t a part of the EcmaScript6 specification.

Why Use TypeScript?

TypeScript is superior to its other counterparts like CoffeeScript and Dart programming languages in a way that TypeScript is extended JavaScript. In contrast, languages like Dart, CoffeeScript are new languages in themselves and require language-specific execution environment.
The benefits of TypeScript include −
  • Compilation − JavaScript is an interpreted language. Hence, it needs to be run to test that it is valid. It means you write all the codes just to find no output, in case there is an error. Hence, you have to spend hours trying to find bugs in the code. The TypeScript transpiler provides the error-checking feature. TypeScript will compile the code and generate compilation errors, if it finds some sort of syntax errors. This helps to highlight errors before the script is run.
  • Strong Static Typing − JavaScript is not strongly typed. TypeScript comes with an optional static typing and type inference system through the TLS (TypeScript Language Service). The type of a variable, declared with no type, may be inferred by the TLS based on its value.
  • TypeScript supports type definitions for existing JavaScript libraries. TypeScript Definition file (with .d.ts extension) provides definition for external JavaScript libraries. Hence, TypeScript code can contain these libraries.
  • TypeScript supports Object Oriented Programming concepts like classes, interfaces, inheritance, etc.

Components of TypeScript

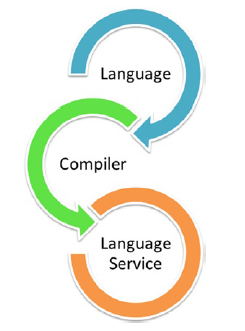
At its heart, TypeScript has the following three components −
  • Language − It comprises of the syntax, keywords, and type annotations.
  • The TypeScript Compiler − The TypeScript compiler (tsc) converts the instructions written in TypeScript to its JavaScript equivalent.
  • The TypeScript Language Service − The "Language Service" exposes an additional layer around the core compiler pipeline that are editor-like applications. The language service supports the common set of a typical editor operations like statement completions, signature help, code formatting and outlining, colorization, etc.
TypeScript Components

Declaration Files

When a TypeScript script gets compiled, there is an option to generate a declaration file (with the extension .d.ts) that functions as an interface to the components in the compiled JavaScript. The concept of declaration files is analogous to the concept of header files found in C/C++. The declaration files (files with .d.ts extension) provide intellisense for types, function calls, and variable support for JavaScript libraries like jQuery, MooTools, etc.

.

Thursday, July 13, 2017

302 IonicV1 Creator Sign Up and Login App Using Firebase Auth


.
302 IonicV1 Creator Sign Up and Login App Using Firebase Auth

1. Prepare Firebase Server

1. Create a Firebase project in the Firebase console, if you don't have one.

2. Click Add Firebase to your web app.

Note the initialization code snippet, which you will use in a minute.
You can retrieve the above data again by following the steps below.

3. Add Firebase connection to Ionic Creator Project.

4. Enter connection details.

Required Settings:
  1. API Key
  2. Auth Domain
  3. Database URL
  4. Storage Bucket
Here's what ionic creator did for you:

Added the Firebase and AngularFire scripts to "External JS" settings
Added the "firebase" module to "Angular Modules" settings
Created a "firebase.init.js" file in "Other JS" where you can find your settings and an example.

2. Create Sign Up Page.

Set the Sign Up Page as default page.
Ionic Creator generates a page with a form template that consists of 3 input fields and a Sign up button.
Add four additional dummy buttons to test our codes in the next coming steps.
In the Property Panel for the components, set as follows:
Component
Properties
Name Input
Directive= ng-model, user.displayName
Email Input
Directive= ng-model, user.email
Password Input
Directive= ng-model, user.password
Sign up Button
Directive=
ng-click, handleSignUp(user)
Sign Up Button
Directive=
ng-click, handleSignUp(user)
Update Button
Directive=
ng-click, handleUpdate(user)
Sign In Button
Directive=
ng-click, handleSignIn(user)
Is Signed In
Directive=
ng-click, handleIsSignedIn(user)
Log Out Button
Directive=
ng-click, handleLogout()

3. Add Controller Codes

function($scope, $stateParams, $state, AuthService, $ionicLoading, $timeout) {
    $scope.user={}
    $scope.handleSignUp = function(user) {
        $ionicLoading.show({
            template: 'Signing Up ...'
        });
        AuthService.doSignUp(user)
            .then(function(user) {
                $ionicLoading.hide();                
                console.log('handleSignUp success:' + JSON.stringify(user))
                //$state.go('user');
            }, function(err) {
                $ionicLoading.hide();                
                console.log('handleSignUp error:' + err)
            });
    }
    $scope.handleUpdate = function(user) { /*update user display name only*/
        $ionicLoading.show({
            template: 'Updating ...'
        });
        AuthService.doUpdate(user)
            .then(function(user) {
                $ionicLoading.hide();                
                console.log('handleUpdate success:' + JSON.stringify(user))
                //$state.go('user');
            }, function(err) {
                $ionicLoading.hide();                
                console.log('handleUpdate error:' + err)
            });
    }
    $scope.handleSignIn = function(user) {
        $ionicLoading.show({
            template: 'Signing In ...'
        });
        AuthService.doSignIn(user)
            .then(function(response) {
                $ionicLoading.hide();                
                console.log('handleSignIn success:' + JSON.stringify(response))
                //$state.go('user');
            }, function(err) {
                $ionicLoading.hide();                
                console.log('handleSignIn error:' + err)
            });
    }    
    $scope.handleIsSignedIn = function(user) {
        $ionicLoading.show({
            template: 'Checking Logged user ...'
        });
        AuthService.isSignedIn(user)
            .then(function(response) {
                $ionicLoading.hide();                
                console.log('handleIsSignedIn success:' +  JSON.stringify(response))
            }, function(err) {
                $ionicLoading.hide();                
                console.log('handleIsSignedIn error:' +  JSON.stringify(err))
            });
    }
    $scope.handleLogout = function() {
        $ionicLoading.show({
            template: 'Logging out ...'
        });
        AuthService.doLogout()
            .then(function(success) {
                $ionicLoading.hide();
                console.log('handleLogout success');
            }, function(err) {
                $ionicLoading.hide();                
                console.log('handleLogout error');
            }).finally(function() {
                $ionicLoading.hide();
            });
    }
}

4. Add Service Codes

service.js
angular.module('app.services', [])
.factory('BlankFactory', [function(){
}])
.service('AuthService', ['$q', function($q){
        this.doSignUp = function(user) {
            var deferred = $q.defer();
            authService = this;
            firebase.auth().createUserWithEmailAndPassword(user.email, user.password)
            .then(function(response) {
                console.log('doSignUp response:' + JSON.stringify(response));
                deferred.resolve(response);
                // After signup we should automatically login the user
                authService.doSignIn(user)
                    .then(function(response) {
                        console.log('doSignUp success');
                        deferred.resolve(response);
                    }, function(error) {
                        // error
                        console.log('doSignUp error');
                        deferred.reject(error);
                    });
            }).catch(function(error) {
                console.log('doSignUp catch:' + error);
                deferred.reject(error);
            });
            return deferred.promise;
        }
        this.doUpdate = function(userupdate) {
            var deferred = $q.defer();
            var user = firebase.auth().currentUser;
            var displayName=userupdate.displayName||'';
            var photoURL=userupdate.photoURL||'';
            if (user) {
                // User is signed in.
                user.updateProfile({
                    displayName: displayName,
                    photoURL: photoURL})
                    .then(function() {
                console.log('doUpdate profile was updated:' + JSON.stringify(user));
                deferred.resolve(user);
                        }).catch(function(error) {
                console.log('doUpdate profile was not updated:' + JSON.stringify(error));
                deferred.reject(0);
                            });                
            } else {
                deferred.reject(0);
            }
            return deferred.promise;
        }        
       
        this.doSignIn = function(user) {
            var deferred = $q.defer();
            firebase.auth().signInWithEmailAndPassword(user.email, user.password).then(function(response) {
                    console.log('doSignIn response:' + JSON.stringify(response))
                    deferred.resolve(response);
                })
                .catch(function(error) {
                    console.log('doSignIn error:' + error)
                    deferred.reject(error);
                });
            return deferred.promise;
        };
        this.isSignedIn = function() {
            var deferred = $q.defer(),
                authService = this,
                signedIn = (authService.getUser() !== null);
            console.log('userisloggedin:' + signedIn)
            deferred.resolve(signedIn);
            return deferred.promise;
        };
        this.getUser = function() {
            var user = firebase.auth().currentUser;
            if (user) {
                // User is signed in.
                console.log('user is signed in:' + JSON.stringify(user));
                return user;
            } else {
                // No user is signed in.
                console.log('no user is signed in');
                return null;
            }
        };
        this.doLogout = function() {
                        var deferred = $q.defer();
            firebase.auth().signOut().then(function() {
                // Sign-out successful.
                console.log('sign out successful');
                deferred.resolve(1);
            }).catch(function(error) {
                // An error happened.
                console.log('an error happened');
                    deferred.reject(0);                
            });
            return deferred.promise;
        };
}]);

DOWNLOAD

REFERENCES

Additional References:

.