Learn the powerful enterprise adaptable database:

Getting Started With ADABAS & Natural

Showing posts with label Frameworks. Show all posts

Friday, May 5, 2017

Understanding PhoneGap project structure


.

1) Recommended App Project Structure

The recommended directory structure contains some specially named directories that contain assets that are part of the build process.

The special directories are:

www: (required) this directory contains the html, javascript and other assets that should be included in your application. This directory should contain a file called index.html that is the HTML root of your application.

merges: (optional) this directory can contains several directories named after platforms supported by PhoneGap Build (ios,android,winphone,windows). Content inside this directory will be copied over the www directory before building the app (after plugin installation). This directory is used for content that will change depending on the platform eg. a stylesheet that should only be used for an android build would be in merges/android/style.css.
Any other sub-directories will not be packaged with the application. For instance your config.xml can contain references to splash screens and icons that are contained in a top level directory and if a file is not used for a splash or icon for a specific platform then it will not be packaged in the app.

IMPORTANT: If a 'platforms' or 'plugins' directory is present they will be deleted as they aren't used and should not contain any assets required for your project.


.

2) Config.xml

The config.xml file is the most essential part of a PhoneGap Build app without it you will not be able to use the build service to build you apps. All apps must have one config.xml file located at the root of the app. Read more about it here, http://docs.phonegap.com/phonegap-build/configuring/ and here, http://pointdeveloper.com/create-config-xml-file-phonegap-build-scratch/.

3) Hello World Explained

Now that we've installed the tools necessary to create and preview the default PhoneGap application, it's worth stopping to take a moment to look through the default application and point out some important details.

viewport

Open the index.html file (located within your project root's www folder) and notice the viewport meta element. This is used to indicate how much of the screen should be used by the application content and specify how it should scale. Scaling refers to the zoom level, where initial-scale indicates the desired zoom upon load, the maximum-scaleminimum-scale values control the least and most allowed and user-scalable properties control whether a user should be allowed to control the scale or zoom factor (via pinch gesture for instance).
In the default application the settings are configured to load the content at 100%, (initial-scale=1) allow no user scaling (user-scalable=no), and use the maximum width and height of the device.
<meta name="viewport" content="user-scalable=no, initial-scale=1, maximum-scale=1, minimum-scale=1,
width=device-width, height=device-height, target-densitydpi=device-dpi" />

cordova.js

In the index.html file you'll notice a script tag pointing to a cordova.js file like below:
<script type="text/javascript" src="cordova.js"></script>
The cordova.js file is the PhoneGap (powered by the open-source Apache Cordova project, hence the name) library and what's used to specifically access the native device hardware (camera, contacts, GPS etc) from JavaScript in our PhoneGap apps. Including this file reference ensures the Cordova APIs have access to those features and are available.
You may notice that there isn't a cordova.js file however located anywhere in the folder. That's because the right version for the platform is injected for you at runtime by the Developer app or the PhoneGap CLI if you're building your projects using the CLI. You simply need to ensure the reference is available.

index.js

The index.js file is another JavaScript file referred to in another script tag in the index.html. This file is not required in your applications, but is specific to this default application and used to add simple logic around determining when the Cordova library has loaded and is ready to be used. More information on that follows in the next section. Notice that the index.html contains a line to call an initialize function via an appvariable right before the closing HTML body tag:
<script type="text/javascript">
  app.initialize();
</script>
This calls the initialize function on the app variable defined in the index.js file under the www/jsfolder. Open that now before moving on.

deviceready

The other important Cordova-specific feature to point out is the deviceready event. This event signals that Cordova's device APIs have loaded and are ready to access. If you start making calls to Cordova APIs without relying on this event, you could end up in a situation where the native code is not yet fully loaded and not available. Applications typically attach an event listener with document.addEventListeneronce the HTML document's DOM has loaded as shown below and in the default Hello application:
document.addEventListener('deviceready', this.onDeviceReady, false);
In the index.js file you'll see that the onDeviceReady function then calls a receivedEvent function to visually display that the device is now ready. It does this by setting the CSS display attribute to none on the initial <p> element that was shown and instead shows the Device is Ready element in index.html by setting its display attribute to block. Below is the relevant code snippet from the index.js followed by the index.html block.

index.js

onDeviceReady: function() {
  app.receivedEvent('deviceready');
},
  // Update DOM on a Received Event
receivedEvent: function(id) {
  var parentElement = document.getElementById(id);
  var listeningElement = parentElement.querySelector('.listening');
  var receivedElement = parentElement.querySelector('.received');

  listeningElement.setAttribute('style', 'display:none;');
  receivedElement.setAttribute('style', 'display:block;');

  console.log('Received Event: ' + id);
}

index.html

<div id="deviceready" class="blink">
  <p class="event listening">Connecting to Device</p>
  <p class="event received">Device is Ready</p>
</div>

more <meta/> tags

Some other meta tags included in the default project are explained here as well.

format-detection

<meta name="format-detection" content="telephone=no" />
This meta tag represents an Apple feature to recognize a telephone number and make an automatic link from it providing implicit click-to-call support. However, too many numbers tend to get selected with this enabled including some addresses, ISBN numbers and other numeric data, so the recommendation is to set it to no to disable it and use the tel: scheme (per RFC 3966) in the URL instead. See this link for more details on this and other meta tags supported by Apple.

msapplication-tap-highlight

<meta name="msapplication-tap-highlight" content="no" />
This meta tag allows you to disable the grey tap highlight on Windows Phone 8 and greater. This property is similar to the -webkit-tap-highlight-color in iOS Safari except an HTML meta element rather than a CSS property.

.

REFERENCE:
http://docs.phonegap.com/tutorials/develop/hello-world-explained/
http://docs.phonegap.com/phonegap-build/getting-started/app-project-structure/

Thursday, May 4, 2017

How To: Install PhoneGap and Create App Projects


.

How To: Install PhoneGap And Create App Projects

There are two editions of PhoneGap; PhoneGap Desktop and PhoneGap CLI.

PhoneGap Desktop application provides a drag and drop interface for creating PhoneGap applications. It's an alternative to using the PhoneGap CLI built for those who prefer a visual user interface over a command line interface approach.

The PhoneGap CLI provides a command line interface for creating PhoneGap apps as an alternative to using the PhoneGap Desktop App for those who prefer working at the command line. The PhoneGap CLI currently has some additional features over the PhoneGap Desktop for building, running and packaging your PhoneGap applications on multiple platforms. If you're comfortable using a CLI this option may be best going forward.

Step 1: Install PhoneGap

The PhoneGap CLI provides a command line interface for creating PhoneGap apps as an alternative to using the PhoneGap Desktop App for those who prefer working at the command line. The PhoneGap CLI currently has some additional features over the PhoneGap Desktop for building, running and packaging your PhoneGap applications on multiple platforms. If you're comfortable using a CLI this option may be best going forward.

Requirements

There are a few simple requirements you'll need prior to installing the PhoneGap CLI:
  • node.js - a JavaScript runtime to build your JavaScript code
  • git - used in the background by the CLI to download assets. It comes pre-installed on some operating systems.
To see if you already have it installed, type git from the command line.

Install Steps

  1. Install the PhoneGap CLI via npm with the following command from the Terminal app (Mac) or Command Prompt (Win).
    $ npm install -g phonegap@latest
    
    TIPS: 1) The $ symbol is used throughout this guide to indicate the command prompt, it should not be typed. 2) npm is the node package manager and installed with node.js. The npm command fetches the necessary dependencies for the PhoneGap CLI to run on your local machine. It creates a node_modules folder with the necessary code needed to run the CLI. The -g flag specifies that folder to be installed at the global location so it can be accessed from anywhere on your machine (defaults to /usr/local/lib/node_modules/phonegap on Mac).
    OS X Users: You may need to prefix this command with sudo to allow installation to restricted directories and type the following instead: $ sudo npm install -g phonegap@latest

    Windows 8 Users: If you just installed Node.js, be sure to start the Node.js Command Promptapplication specifically.
  2. Test to ensure the PhoneGap CLI is properly installed by typing phonegap on the command line. You should see the following help text output displayed:
    $ phonegap
    Usage: phonegap [options] [commands]
    Description:
    PhoneGap command-line tool.
    Commands:
       help [command]       output usage information
       create <path>        create a phonegap project
        ...
    
    TIP: You can access the PhoneGap CLI usage text at any time by adding the keyword help, or the -h or --h attribute with any phonegap command i.e.: $ phonegap create help$ phonegap serve -h.

(Ref: http://docs.phonegap.com/getting-started/1-install-phonegap/cli/)
.

Step 2: Install Mobile App

The PhoneGap Developer App is a mobile app that runs on devices and allows you to preview and test the PhoneGap mobile apps you build across platforms without additional platform SDK setup. It automatically provides access to the PhoneGap core APIs providing instant access to the native device features without having to install any plugins or compile anything locally. It's meant to provide an easy way for developers to get started creating and testing their PhoneGap applications quickly with minimal setup.

Install PhoneGap Developer

  1. Locate the free PhoneGap Developer app from one of the following supported app marketplaces and install it to your mobile device:
  2. Once installed, tap the PhoneGap Developer app icon from your home screen to open it:
    PhoneGap Developer App, iOS
  3. Once installed, move on to the next step where you will create your first PhoneGap app using the tool you selected in step 1.
    NOTE: The platform SDKs mentioned above refer to the software development kits Apple, Google and Microsoft provide to build applications for their platforms (iOS, Android and Windows respectively). When you're ready to take your mobile application development further or decide you want to build for each platform locally yourself, you can find the specific instructions for each platform in the PhoneGap Platform Installation Guides.

(Ref: http://docs.phonegap.com/getting-started/2-install-mobile-app/)
.

Step 3: Create Your App

Now that you've installed PhoneGap Desktop and/or the PhoneGap CLI

Create Default PhoneGap Project

The PhoneGap CLI has a default Hello World project for beginners to start with. It's proven to be the quickest and easiest way to understand the basics of building a mobile PhoneGap app so let's start by creating the default project with the CLI.
  1. Enter the following command from your terminal:
    $ phonegap create myApp
    
    This will create a folder named myApp in the current path location with a default project name of Hello World and id of com.phonegap.helloworld.
    You can also specify a name and identifier to ensure the project is unique but still contains the default Hello World code project by specifying them as qualified parameters as shown below:
    $ phonegap create myApp --id "org.myapp.sample" --name "appSample"
    
    TIP: Each of the create command options is documented in the help text and can be accessed with $ phonegap create help. To access general help from the CLI, type -h or help with any command.
  2. Verify that you see the following output in your console after you run the command:
    Creating a new cordova project.
    
  3. Change into the new project directory with the cd command:
    $ cd myApp/
    
  4. Check to be sure you see the following set of files and folders shown below:
    config.xml    hooks    platforms    plugins    www
    
  5. cd into the www folder and look around at the files and subfolders in there, this is the content of your app, with the entry point being the index.html file.
    $ cd www/
    
    TIP: Details about the rest of the files and folders created in the root project will be covered in guides further along. For now just focus on the www folder and its contents.
(Ref: http://docs.phonegap.com/getting-started/3-create-your-app/cli/)
.

Step 4: Preview Your App

The PhoneGap CLI has a serve command that starts a small web server to host your project where it can then be consumed by the PhoneGap Developer App running on a mobile device or your desktop browser.

Preview in a Desktop Browser

You can test your apps in your desktop browser first to speed up your initial development process. For instance, if you're using a framework like Angular or React, there are tools available for specifically debugging those frameworks in the browser that can be quite helpful before moving over to a device. Recently PhoneGap began supporting the browser platform as a target automatically to help you test with the deviceready event and Apache Cordova core plugins more easily in an environment you're already familiar with.
Refer to the PhoneGap Browser Support Reference guide for specific details.

Preview on a Device

You can use the PhoneGap Developer App paired with the PhoneGap CLI to immediately preview your app on a device without installing platform SDKs, registering devices, or compiling code. The PhoneGap CLI starts a small web server to host your project and returns the server address for you to pair with from the PhoneGap Developer App running on your mobile device.
Double check to ensure you're running your device and computer on the same network before continuing.
  1. cd into the project directory created in the previous step and type $ phonegap serve. You will receive the server address the app is being hosted on in the output received in the console (192.168.1.11:3000 in this example):
    $ phonegap serve
    [phonegap] starting app server...
    [phonegap] listening on 192.168.1.11:3000
    [phonegap]
    [phonegap] ctrl-c to stop the server
    [phonegap]
    
  2. Now go to your mobile device where the PhoneGap Developer App is running, enter the server address on the main screen and tap Connect.
    PhoneGap Developer App, iOS
    NOTE: Tap directly on the server address displayed in the terminal screen of the PhoneGap Developer app to change it to match yours. The value filled in by default is only a sample.
    You should see the connection occur followed by a success message as shown below. If you receive an error of any kind, ensure once again that you are connected to the same network on both your device and your computer. You could also check the issue tracker and PhoneGap Google Groups list for further help.
    Developer App, connection success
    Once the PhoneGap Developer app connects and loads your mobile application, it should be displayed for preview as shown below:
    Developer App, preview
    TIP: Gestures can be used while you're previewing your app. A 3 finger tap will return you to the main screen, a 4 finger tap will cause a refresh.

    Making Updates

  3. Now let's make an update to some code to see how easy it is to test changes. Using your favorite text editor, open up the index.html file located within the www folder of your project; for instance ~/appSample/www/index.html
    TIP: Some popular lightweight but powerful editors include BracketsSublime TextAtom and Code. If you're looking for more of an IDE with extensive features and plugins including code hinting and type-ahead, check out WebStorm by JetBrains
  4. Choose an update to make. Let's start by changing the PHONEGAP text that's displayed in the app from <h1>PhoneGap</h1> to <h1>Hello PhoneGap</h1>. (This text has a CSS uppercase transform applied to it in the default project). Save it when you're finished and move on to the next step. 
  5. Now check your mobile device where your PhoneGap Developer app is running and you will see your app reload and automatically display the new text!
    Developer App update preview
  6. Continue making updates to your project to get familiar with this workflow.
    At this point you should check out this guide explaining important details about the default Hello PhoneGap application and mobile application development tips with PhoneGap in general.
(Ref: http://docs.phonegap.com/getting-started/4-preview-your-app/cli/)
.


Wednesday, May 3, 2017

Mobile Apps Framework: Cordova or PhoneGap?


.

Mobile Apps Framework: Cordova or PhoneGap?

How PhoneGap Became Apache Cordova and Adobe PhoneGap
Let's start with the short version:
  • Apache Cordova is the current name for the open source project formerly known as PhoneGap.
  • Adobe PhoneGap is Adobe's distribution (flavor) of Apache Cordova, with some extra capabilities added by Adobe.
Here's what happened. In 2011, Adobe acquired Nitobi, the company that created and managed the open source PhoneGap project. PhoneGap was already used by several vendors in their software products. Also, since PhoneGap provided an easy way to deliver cross-platform mobile apps, a capability that was highly valued by development organizations, product companies (IBM, for example) and even some hardware vendors and mobile OS vendors (such as Google) were involved in the project. To protect stewardship and to help ensure the longevity of the PhoneGap project, Nitobi donated PhoneGap to the Apache Software Foundation immediately before closing the acquisition with Adobe. This action placed the project in a protected space, enabled invested parties to remain involved, and actually helped to make the project more visible in the community.
The PhoneGap project had a bit of a schizophrenic beginning at Apache. When the project was first donated, the team gave it a new name: Apache Callback. That name wasn't too popular, and it was quickly renamed Apache DeviceReady (because the PhoneGap capabilities were available in a PhoneGap app after the deviceready event fired). That name also failed, and the project finally stabilized under the name Apache Cordova, deriving its name from the street where the Nitobi offices were located when PhoneGap was created.
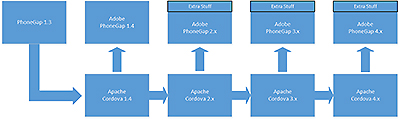
With a new name and now safely ensconced within the Apache Software Foundation, the project was ready to soar. At this point (around the time of release 1.4), Apache Cordova was simply the new name for PhoneGap; the two were essentially synonymous. Once Nitobi settled within Adobe, however, the team created a distribution of Apache Cordova and called it Adobe PhoneGapFigure 1 illustrates how this process started and what it looks like today, as each version of Apache Cordova becomes a distribution of Adobe PhoneGap.

Figure 1 PhoneGap became Apache Cordova and Adobe PhoneGap.
After the initial release of Apache Cordova, the Cordova team started implementing new tools to simplify the process of creating and maintaining a Cordova application project. With early versions of PhoneGap (versions 1 through 2.x), creating projects for different mobile operating systems required different processes and tools for each. Beginning with Cordova 3, a unifying set of tools was added (the Cordova command-line interface) and a consistent project folder was implemented. It was suddenly much, much easier to work with Cordova application projects.
The former Nitobi team, now part of Adobe, stayed involved in the project and helped shepherd new features and capabilities. They also started thinking about how Adobe could enhance Cordova. With an open source project, the team could implement many improvements, but some changes would have been difficult or expensive to deliver. The Adobe team also came up with some interesting enhancements that really didn't belong in the Cordova project, either because they'd be difficult to maintain with existing Cordova team members or because they had commercial requirements that an open source project simply couldn't tackle. These enhancements (the "extra stuff" boxed in Figure 1) became additional capabilities delivered by Adobe's distribution of Apache Cordova, now officially called Adobe PhoneGap.
Still puzzled? Think of it this way: If we're discussing Linux distributions and I mention Debian, we've moved from a conversation about an open source operating system (Linux) to talking about a specific distribution of Linux, in this case the Debian distribution. If I say I'm using Linux, I could mean Debian—or any of a number of other Linux distributions. But if I say I'm using Debian, I mean that I'm using the Debian distribution of Linux.
When people mention using PhoneGap, they're probably referring to Cordova, but they might mean Adobe's distribution of Cordova instead. So they could be using Cordova and calling it by the wrong name, or using PhoneGap and one or more of the additional parts that Adobe provides in its distribution of the framework (the "extra stuff" in Figure 1).
Though the name changes happened years ago, people are surprisingly still confused about the difference between PhoneGap (Adobe) and Cordova (Apache). Here's an example of the confusion: My book PhoneGap Essentials: Building Cross-Platform Mobile Apps is still the bestselling book on PhoneGap, even though it was published in 2012 and covers a version of PhoneGap that is no longer available (and differs dramatically from the current version). Why are people still buying the book? Because the project is more widely known as PhoneGap than as Cordova. Though more books are available for Cordova than for PhoneGap, the older PhoneGap books still sell—even though they're too old to be useful anymore. Amazon and other vendors don't automatically make the connection between PhoneGap and Cordova, so customers are misdirected to older books when PhoneGap is used as a search term.
Meanwhile, Apache Cordova is now included in many commercial software products. Oracle, Salesforce, and many other companies use Cordova in their mobile development platforms. IBM MobileFirst (formerly known as IBM Worklight) includes a distribution of Cordova. IBM also contributes to the Cordova project, staffing the project with many developers.
.

Monday, May 1, 2017

How To: Create Cordova App with Camera Plug In


.

How To: Create Cordova App with Camera Plug In 

.
This example demonstrates how cordova-cli can be used to create a mobile app project with the camera plugin and run it for Android or iOS platform. In particular, platform specific options like --keystore (Android) can be provided as well.

If you haven't installed Cordova CLI to your pc, follow this tutorial first, http://programming-steps.blogspot.com/2017/05/how-to-install-cordova-and-create-app.html

1) Create Android/iOS Project


Console Command (Android):
# Create a cordova project
cordova create myApp com.myCompany.myApp myApp
cd myApp

# Add camera plugin to the project and remember that in config.xml
cordova plugin add cordova-plugin-camera --save

# Add camera plugin to the project and remember that in config.xml. Use npm install to fetch.
cordova plugin add cordova-plugin-camera --save --fetch

# Add android platform to the project and remember that in config.xml
cordova platform add android --save

# Add android platform to the project and remember that in config.xml. Use npm install to fetch.
cordova platform add android --save --fetch

# Check to see if your system is configured for building android platform.
cordova requirements android

# Build the android and emit verbose logs.
cordova build android --verbose

# Run the project on the android platform.
cordova run android

# Build for android platform in release mode with specified signing parameters.
cordova build android --release -- --keystore="..\android.keystore" --storePassword=android --alias=mykey

.
Console Command (iOS):
# Create a cordova project
cordova create myApp com.myCompany.myApp myApp
cd myApp

# Add camera plugin to the project and remember that in config.xml
cordova plugin add cordova-plugin-camera --save

# Add camera plugin to the project and remember that in config.xml. Use npm install to fetch.
cordova plugin add cordova-plugin-camera --save --fetch

# Add ios platform to the project and remember that in config.xml
cordova platform add ios --save

# Add ios platform to the project and remember that in config.xml. Use npm install to fetch.
cordova platform add ios --save --fetch

# Check to see if your system is configured for building ios platform.
cordova requirements ios

# Build the ios and emit verbose logs.
cordova build ios --verbose

# Run the project on the ios platform.
cordova run ios


.
Both Android and iOS platform commands above will create the following config.html:


<?xml version='1.0' encoding='utf-8'?>
<widget id="com.myCompany.myApp" version="1.0.0" xmlns="http://www.w3.org/ns/widgets" xmlns:cdv="http://cordova.apache.org/ns/1.0">
    <name>myApp</name>
    <description>
        A sample Apache Cordova application that responds to the deviceready event.
    </description>
    <author email="dev@cordova.apache.org" href="http://cordova.io">
        Apache Cordova Team
    </author>
    <content src="index.html" />
    <access origin="*" />
    <allow-intent href="http://*/*" />
    <allow-intent href="https://*/*" />
    <allow-intent href="tel:*" />
    <allow-intent href="sms:*" />
    <allow-intent href="mailto:*" />
    <allow-intent href="geo:*" />
    <platform name="android">
        <allow-intent href="market:*" />
    </platform>
    <platform name="ios">
        <allow-intent href="itms:*" />
        <allow-intent href="itms-apps:*" />
    </platform>
    <engine name="android" spec="^6.2.3" />
    <engine name="ios" spec="^4.4.0" />
    <plugin name="cordova-plugin-camera" spec="^2.4.1" />
    <plugin name="cordova-plugin-whitelist" spec="^1.3.2" />
</widget>


.

2) Edit Index

Replace the index.html content with the following codes:


<!DOCTYPE html>
<html>
  <head>
    <title>Capture Photo</title>
    <script type="text/javascript" charset="utf-8" src="cordova.js"></script>
    <script type="text/javascript" charset="utf-8">
    var pictureSource;   // picture source
    var destinationType; // sets the format of returned value
    // Wait for device API libraries to load
    //
    document.addEventListener("deviceready",onDeviceReady,false);
    // device APIs are available
    //
    function onDeviceReady() {
        pictureSource=navigator.camera.PictureSourceType;
        destinationType=navigator.camera.DestinationType;
    }
    // Called when a photo is successfully retrieved
    //
    function onPhotoDataSuccess(imageData) {
      // Uncomment to view the base64-encoded image data
      // console.log(imageData);
      // Get image handle
      //
      var smallImage = document.getElementById('smallImage');
      // Unhide image elements
      //
      smallImage.style.display = 'block';
      // Show the captured photo
      // The inline CSS rules are used to resize the image
      //
      smallImage.src = "data:image/jpeg;base64," + imageData;
    }
    // Called when a photo is successfully retrieved
    //
    function onPhotoURISuccess(imageURI) {
      // Uncomment to view the image file URI
      // console.log(imageURI);
      // Get image handle
      //
      var largeImage = document.getElementById('largeImage');
      // Unhide image elements
      //
      largeImage.style.display = 'block';
      // Show the captured photo
      // The inline CSS rules are used to resize the image
      //
      largeImage.src = imageURI;
    }
    // A button will call this function
    //
    function capturePhoto() {
      // Take picture using device camera and retrieve image as base64-encoded string
      navigator.camera.getPicture(onPhotoDataSuccess, onFail, { quality: 50,
        destinationType: destinationType.DATA_URL });
    }
    // A button will call this function
    //
    function capturePhotoEdit() {
      // Take picture using device camera, allow edit, and retrieve image as base64-encoded string
      navigator.camera.getPicture(onPhotoDataSuccess, onFail, { quality: 20, allowEdit: true,
        destinationType: destinationType.DATA_URL });
    }
    // A button will call this function
    //
    function getPhoto(source) {
      // Retrieve image file location from specified source
      navigator.camera.getPicture(onPhotoURISuccess, onFail, { quality: 50,
        destinationType: destinationType.FILE_URI,
        sourceType: source });
    }
    // Called if something bad happens.
    //
    function onFail(message) {
      alert('Failed because: ' + message);
    }
    </script>
  </head>
  <body>
    <br/>
    <br/>
    <button onclick="capturePhoto();">Capture Photo</button> <br>
    <button onclick="capturePhotoEdit();">Capture Editable Photo</button> <br>
    <button onclick="getPhoto(pictureSource.PHOTOLIBRARY);">From Photo Library</button><br>
    <button onclick="getPhoto(pictureSource.SAVEDPHOTOALBUM);">From Photo Album</button><br>
    <img style="display:none;width:60px;height:60px;" id="smallImage" src="" />
    <img style="display:none;" id="largeImage" src="" />
  </body>
</html>


.

3. Build Android/iOS Project

Console Command (Android):

# Build the android and emit verbose logs.
cordova build android --verbose

# Run the project on the android platform.
cordova run android

# Build for android platform in release mode with specified signing parameters.
cordova build android --release -- --keystore="..\android.keystore" --storePassword=android --alias=mykey

.
Console Command (iOS):

# Build the ios and emit verbose logs.
cordova build ios --verbose

# Run the project on the ios platform.
cordova run ios


OUTCOME:


.
Reference:
http://cordova.apache.org/docs/en/7.x/reference/cordova-cli/index.html#examples
http://cordova.apache.org/docs/en/7.x/reference/cordova-plugin-camera/index.html
.