
.
301 IonicV1 Creator Chat App Using Firebase
1. Create a project.
Project Properties
Project Name=IonicFireChat
Template=Blank
Template=Blank
Page Properties
Padding=No
Scrolling=No
2. Add Components and Sub-Components.
Component
|
Sub-Component
|
Properties
|
Container
|
Style/Tag=ion-scroll
Style/Classes=top-panel
| |
Avatar List
| ||
List-Item
|
Text/Content=message.text
Directive=
ng-repeat, message in messages
| |
Form
|
Style/Classes=bottom-panel
Directive=
ng-submit, addMessage()
| |
Input
|
Title=Message:
Directive=
ng-model, data.text
| |
Button
|
Text=Send
|
3. SCSS
Add the following styling codes
.top-panel{
height: calc(100% - 96px); overflow:scroll; } .bottom-panel{ position:absolute; bottom:0px; display:block; width:100%; background-color:white; button{ margin:0px !important; } } |
4. Edit Controller
The following codes are used for testing the initial data input/output.
function ($scope, $stateParams) {
$scope.messages=[]; $scope.data = {}; $scope.addMessage=function(){ $scope.messages.push({text:$scope.data.text}); $scope.data.text=''; } } |
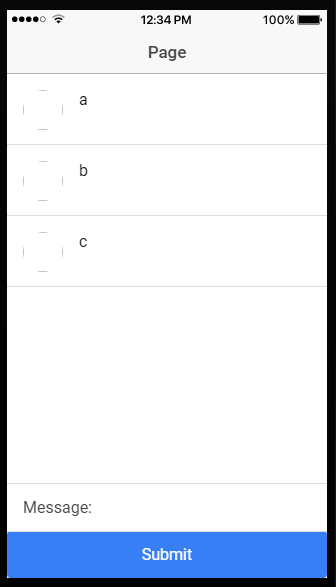
If we run the project now, we should be able to submit a value and see it displayed in the list.
Bear in mind that the data is stored in the temporary array variable.
You will lose them when you refresh the project.
5. Add Scroll Glue Effect to the List
5.1. Add a javascript file, scrollglue.js
(the file name will be automatically added to Code-Settings/External-JS-list)
/* angularjs Scroll Glue
* version 2.0.7 * https://github.com/Luegg/angularjs-scroll-glue * An AngularJs directive that automatically scrolls to the bottom of an element on changes in it's scope. */ // Allow module to be loaded via require when using common js. e.g. npm if(typeof module === "object" && module.exports){ module.exports = 'luegg.directives'; } (function(angular, undefined){ 'use strict'; function createActivationState($parse, attr, scope){ function unboundState(initValue){ var activated = initValue; return { getValue: function(){ return activated; }, setValue: function(value){ activated = value; } }; } function oneWayBindingState(getter, scope){ return { getValue: function(){ return getter(scope); }, setValue: function(){} }; } function twoWayBindingState(getter, setter, scope){ return { getValue: function(){ return getter(scope); }, setValue: function(value){ if(value !== getter(scope)){ scope.$apply(function(){ setter(scope, value); }); } } }; } if(attr !== ""){ var getter = $parse(attr); if(getter.assign !== undefined){ return twoWayBindingState(getter, getter.assign, scope); } else { return oneWayBindingState(getter, scope); } } else { return unboundState(true); } } function createDirective(module, attrName, direction){ module.directive(attrName, ['$parse', '$window', '$timeout', function($parse, $window, $timeout){ return { priority: 1, restrict: 'A', link: function(scope, $el, attrs){ var el = $el[0], activationState = createActivationState($parse, attrs[attrName], scope); function scrollIfGlued() { if(activationState.getValue() && !direction.isAttached(el)){ direction.scroll(el); } } function onScroll() { activationState.setValue(direction.isAttached(el)); } scope.$watch(scrollIfGlued); $timeout(scrollIfGlued, 0, false); $window.addEventListener('resize', scrollIfGlued, false); $el.on('scroll', onScroll); // Remove listeners on directive destroy $el.on('$destroy', function() { $el.unbind('scroll', onScroll); }); scope.$on('$destroy', function() { $window.removeEventListener('resize', scrollIfGlued, false); }); } }; }]); } var bottom = { isAttached: function(el){ // + 1 catches off by one errors in chrome return el.scrollTop + el.clientHeight + 1 >= el.scrollHeight; }, scroll: function(el){ el.scrollTop = el.scrollHeight; } }; var top = { isAttached: function(el){ return el.scrollTop <= 1; }, scroll: function(el){ el.scrollTop = 0; } }; var right = { isAttached: function(el){ return el.scrollLeft + el.clientWidth + 1 >= el.scrollWidth; }, scroll: function(el){ el.scrollLeft = el.scrollWidth; } }; var left = { isAttached: function(el){ return el.scrollLeft <= 1; }, scroll: function(el){ el.scrollLeft = 0; } }; var module = angular.module('luegg.directives', []); createDirective(module, 'scrollGlue', bottom); createDirective(module, 'scrollGlueTop', top); createDirective(module, 'scrollGlueBottom', bottom); createDirective(module, 'scrollGlueLeft', left); createDirective(module, 'scrollGlueRight', right); }(angular)); |
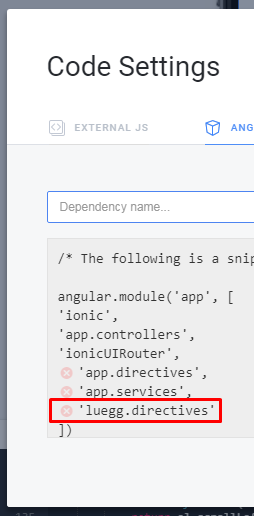
5.2. Add a module ‘luegg.directives’ to Code-Settings/Angular-Modules
5.3. Add a Directive property “scroll-glue” to Container.

6. Add Firebase Connection
6.1. Prepare Firebase Project and Database
6.2. Add Child to the Database
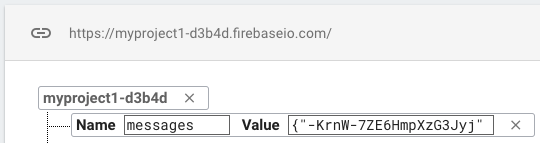
We will add a child ie “messages” as a location to store all messages submit via the ionic app in real time.

Copy the following strings.
Name
|
messages
|
Value
|
{ "-KrnW-7ZE6HmpXzG3Jyj" : {
"email" : "test@test.com",
"name" : "testname",
"text" : "testtext"
}}
|
Paste to the Name and Value fields below.
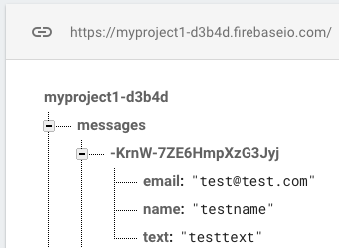
OUTCOME.
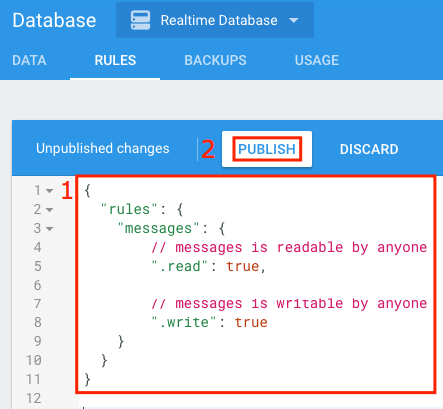
6.3. Set the Database Permission.
Copy the following rules.
{
"rules": {
"messages": {
// messages is readable by anyone
".read": true,
// messages is writable by anyone
".write": true
}
}
}
|
Paste to the RULES tab.
Click PUBLISH button.
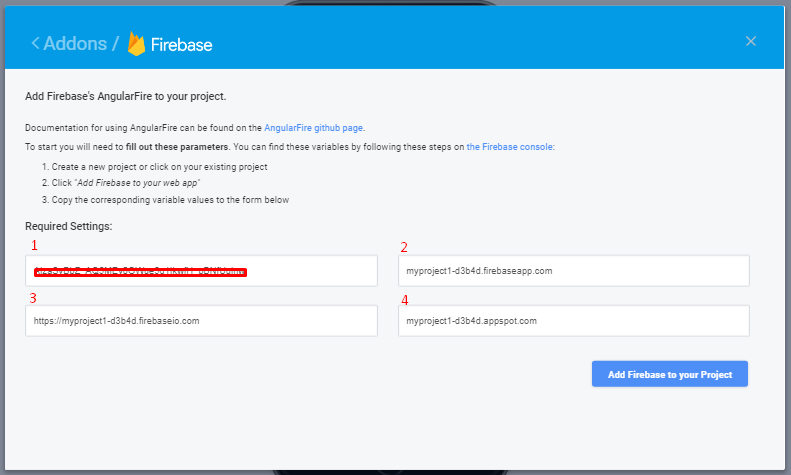
6.4. Add Firebase connection to Ionic Creator.


6.5. Enter connection details.
Required Settings:
- API Key
- Auth Domain
- Database URL
- Storage Bucket
Here's what ionic creator did for you:
Added the Firebase and AngularFire scripts to "External JS" settings
Added the "firebase" module to "Angular Modules" settings
Created a "firebase.init.js" file in "Other JS" where you can find your settings and an example.
Added the Firebase and AngularFire scripts to "External JS" settings
Added the "firebase" module to "Angular Modules" settings
Created a "firebase.init.js" file in "Other JS" where you can find your settings and an example.

6.6. Edit Controller
function ($scope, $stateParams, $firebaseArray) {
$scope.data = {}; var ref = firebase.database().ref().child("messages"); // create a synchronized array $scope.messages = $firebaseArray(ref); // add new items to the array // the message is automatically added to our Firebase database! $scope.addMessage = function() { $scope.messages.$add({ text: $scope.data.text, email: "test@test.com", name: "test" }); $scope.data.text = ''; }; } |
6.7. Outcome.
The first time you run the app, you will see the first data that you have entered at the server in Step 6.2.
Let’s say you enter “Hello” and submit, the text will be added to the list.

And if you check at the server, the new data is there as well.
Notice that in Step 6.6 we have hard-coded the value for email and name.
Thus in the server, we will see “test@test.com” and “test” for the respective fields.

7. DOWNLOAD
REFERENCE
.
No comments:
Post a Comment