.
102 Ionic Creator Page Links
1.Create New Project
Project Name = Page Links
Template = Side Menu
2. Default Page Links In Side Menu
By defauts, page links have been created in Side Menu.
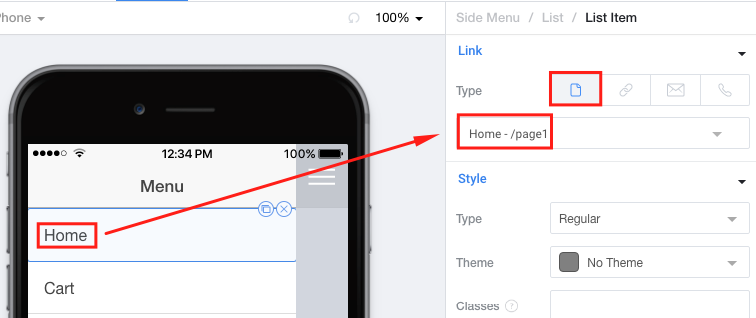
3. Route Parameters
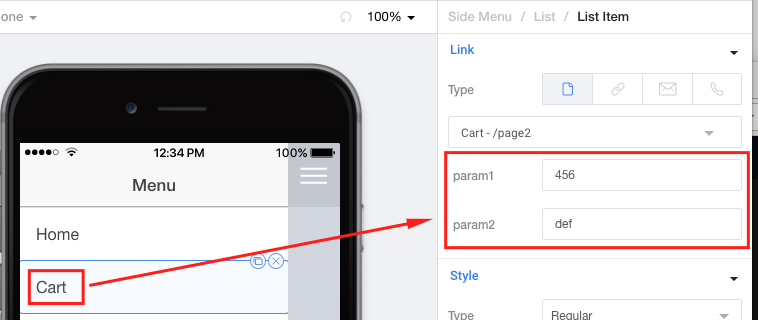
Go to Page 2 Design (Cart).
Add Route Parameters as follows:
param1 = 123
param2 = abc

Add JS Codes. (Cart Controller)
function ($scope, $stateParams) {
alert(
angular.toJson($stateParams.param1)+"\n"+
angular.toJson($stateParams.param2)+"\n"
)
}
|
When you go back to Side Menu Design, you will notice that new properties are added to the Properties Panel.
Put some values ie 456 and def.
4. Test Run.
You should get an alert window as shown below.

If you edit Side Menu design and delete the values from the route parameter properties, you will get the default values for the parameters.

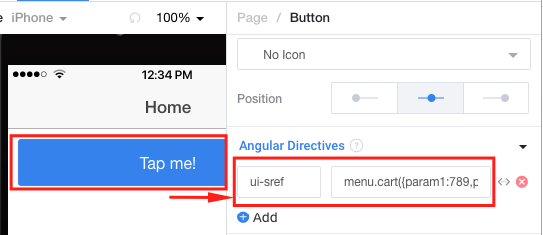
5. Using ui-sref
Add a button to Home Page.
Add Angular Directives…
ui-sref=menu.cart({param1:789,param2:'ghi'})
You should be getting the following outcome.

6. Using $state.go
Add a second button to Home Page.
Add Angular Directives…
ng-click=goToCart()

Add JS Codes. (Home Controller)
function ($scope, $stateParams,$state) {
$scope.goToCart=function(){
$state.go('menu.cart',{param1:999,param2:'rescue'})
}
}
|
You should be getting the following outcome.

the $state.go by default adds a back button. The solution to make it behave exactly the same way is to call:
$ionicHistory.nextViewOptions({disableBack: true}); before calling $state.go. |
GITHUB:
PLUNKER:
http://next.plnkr.co/plunks/LnCTJnh3E6LNObAO
1. Navigation & Special Links
The Link Property
On many Components throughout Creator you'll find the Link Property. This property allows you to:
- Link to a separate page
- Specify Route Parameters when linking to a separate page
- Link to an External URL
- Open an email client with an Email Address pre-populated
- Open the phone dialer with a Phone Number pre-populated
Linking to a Separate Page in Creator
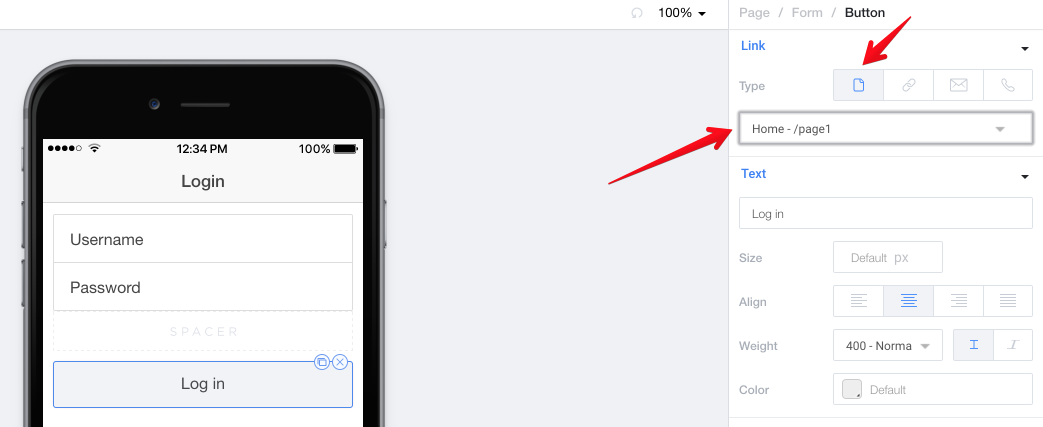
If you'd like to navigate to a different page, you can use any of the Link-able components to do so easily. Just choose the Page option for your link, then choose the specific page you'd like to navigate to from the dropdown.
Specifying Route Parameters when Navigating to a different page
Check out 2. Route Parameters Documentation for more information on working with route parameters.
Cordova InAppBrowser
Note on External URLs, Emails, and Phone Numbers
If you are going to use the External URLs, Emails, or Phone Numbers functionality of the Link Property, the native plugin inappbrowser is required.
inappbrowser is automatically included in our Package Export, but if you're working locally, make sure it's installed by running cordova plugin add cordova-plugin-inappbrowser.
Presently, these three options will not work in Creator Mobile when testing, since Creator Mobile loads your app in an iFrame, we're working on a change for this.
Linking to an External URL
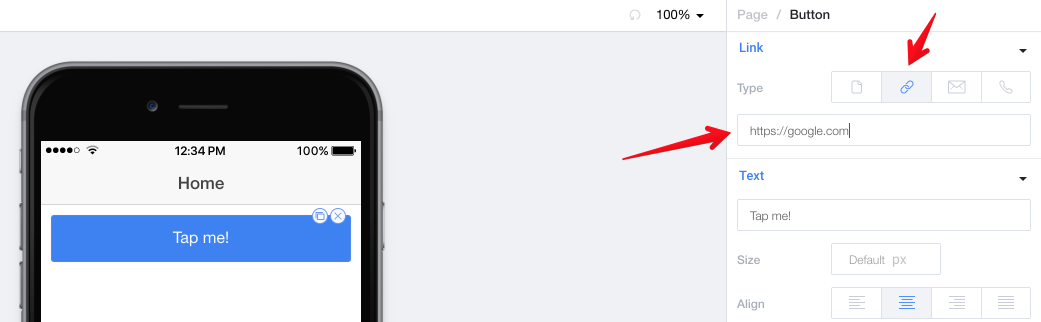
Simply choose the Link Option and specify your URL and you'll have an external link in your app. Please see the inappbrowser note above to make sure this opens in a browser and not over your Ionic application (breaking everything in the process).
Open the Email Client with an email address
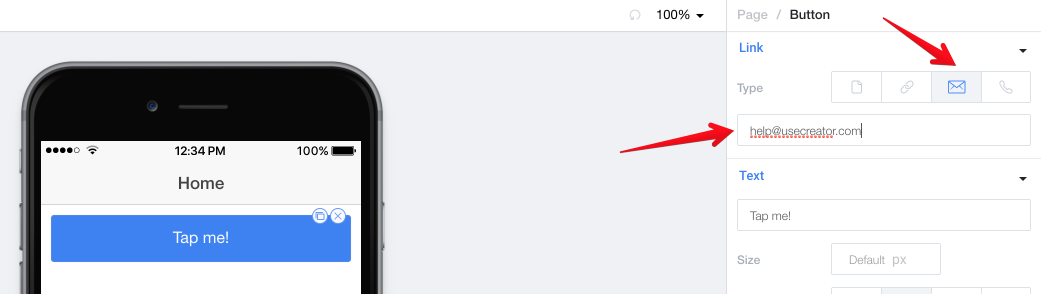
Just choose the email option, then specify what email address you'd like to open in the mail client. Please see the inappbrowser note above to make sure this actually opens in your phones email client.
Open a phone number in the phones dialer
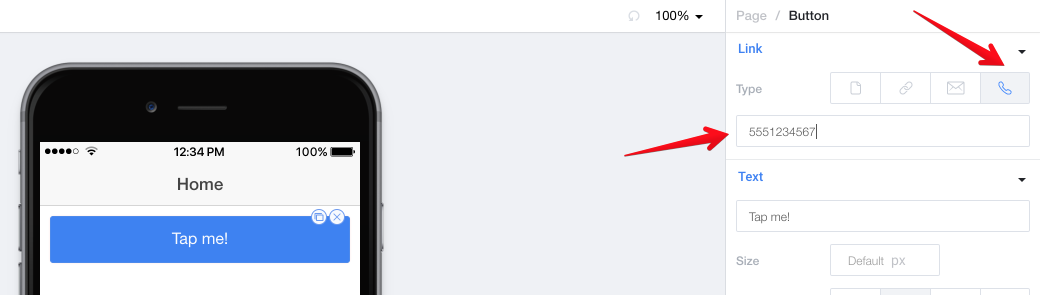
Choose the phone option, then specify the phone number you'd like to open in the dialer. Please see the inappbrowser note above to make sure this actually opens in your phones email client.
Using ui-sref in HTML Pages and the HTML Component
You can also use the ui-sref directive in HTML Pages and HTML Components to link to other pages. Please see 3. HTML Template Pages for information on how to use ui-sref.
Using $state.go to Navigate in your Controller Code
You can also use $state.go in your controller code to navigate between pages. For more information on using $state.go both with and without Route Parameters, check out 2. Route Parameters.
2. Route Parameters
Route Parameters allow you to pass information to your pages when you navigate to them. For instance, if you had a list of conversations, you could pass the conversation ID to a specific "single conversation" page when you click on one. This would allow you to load that conversation in your code to populate it dynamically. 💪
Check out a real world example!
If you'd like to see a real world example of how to use Route Parameters, I recommend watching the Using APIs with $http Part 2 Weekly Workshop. The Search page in that tutorial uses Route Parameters to narrow down search results from a complex search form.
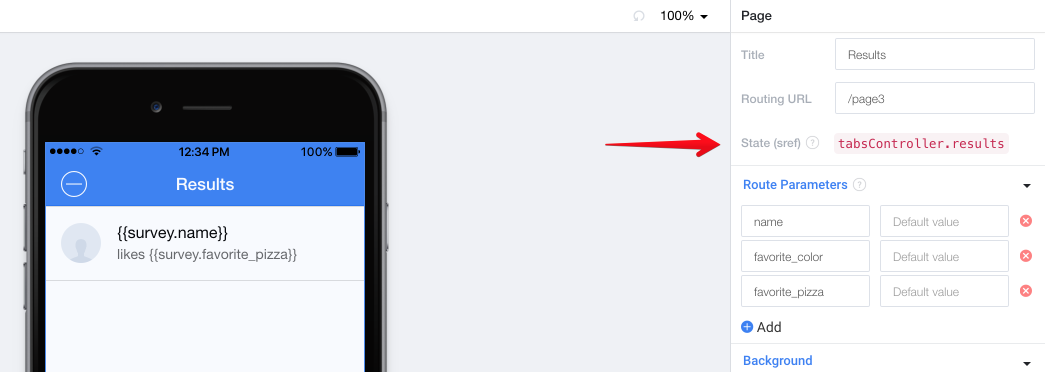
Adding Route Parameters to your Page
Every page can have multiple Route Parameters, and you can also assign default values to them. Each parameter name should be "code friendly" (no spaces, etc).
You can find a Page's route parameters in the property pane. Just click on add and set up your parameters and any default values you might need.
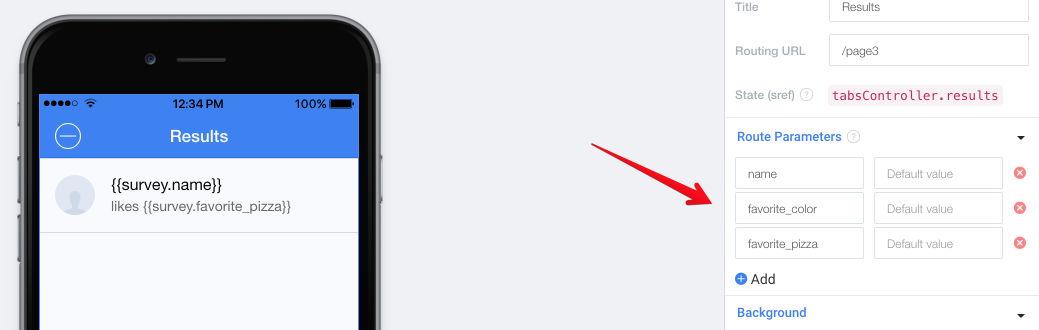
Here is our Search Results page, where we've set up the variables name, favorite_color, and favorite_pizza. None of them have default values since we want the page to show all (un-narrowed down) results by default.
Passing Information to a Page
There are two primary ways to pass information to a page that has Route Parameters.
The first is to use any of our components that has the "Link" property which will automatically ask you for Route Parameter information.
You can feel free to leave any of the items blank, you can include a String, or you can include dynamic data using Template tags.
Using $state.go to pass information
Alternatively, you can use $state.go in your Controller code and pass the Route Parameters as an object. Be sure to import $state in your controller.
Get the State for $state.go from the Page Properties
When you have a page selected, under it's Title in properties you'll see it's "State / sref", this is what you use for $state.go!
Here's an example for how you'd use $state.go to navigate and pass dynamic parameters to your page.

function ($scope, $stateParams, $state){
$scope.fields={
name:'',
favorite_color:'Any Color',
favorite_pizza:'Any topping'
}
$scope.search=function(){
$state.go('tabsController.results',$scope.fields);
}
}
|
Accessing the Info you Passed
All information that you've passed to your page is available using $stateParams in your pages controller. We automatically inject $stateParams for you in every controller, but make sure that it's still there if you encounter any issues.
Using our previous example of name, favorite_color, and favorite_pizza as parameters, each of these three become available as $stateParams.name, $stateParams.favorite_color, and $stateParams.favorite_pizza.
If a parameter is not set, it will either be undefined or be an empty string.
Here's an example of how you might access your data (taken from our $http Part 2 tutorial):
// The following is the constructor function for this page's controller. See https://docs.angularjs.org/guide/controller
// You can include any angular dependencies as parameters for this function // TIP: Access Route Parameters for your page via $stateParams.parameterName function ($scope, $stateParams, Survey) { // Make the parameters accessible on $scope. $scope.params = $stateParams; $scope.surveys = []; $scope.loadData = function(){ // Here we check to see if any of our parameters have been set. // If so, let's pass them to a Query instead of selecting All results. if ($scope.params.name || $scope.params.favorite_color || $scope.params.favorite_pizza){ Survey.query($scope.params).then(function(res){ $scope.surveys = res; $scope.$broadcast('scroll.refreshComplete'); }) }else{ Survey.all().then(function(res){ $scope.surveys = res; $scope.$broadcast('scroll.refreshComplete'); }) } } $scope.loadData(); } |
Additionally, if you're using the HTML component or HTML pages, you can use the ui-sref directive to pass route parameter information. Read 3. HTML Template Pages.
3. HTML Template Pages
In Creator, you're normally working with a page through our Drag & Drop components system. But perhaps you want to have 100% control over the Page's template, in that case we have HTML Pages.
HTML Pages Can't Use Drag & Drop
Once a page is converted to an HTML page, you can no longer use our Drag & Drop components on that page, you will only be able to edit the page via pure HTML manually.
Adding an HTML based Page
An HTML page can be added in one of two ways. The first is to add an HTML page outright from the Add a Page menu.
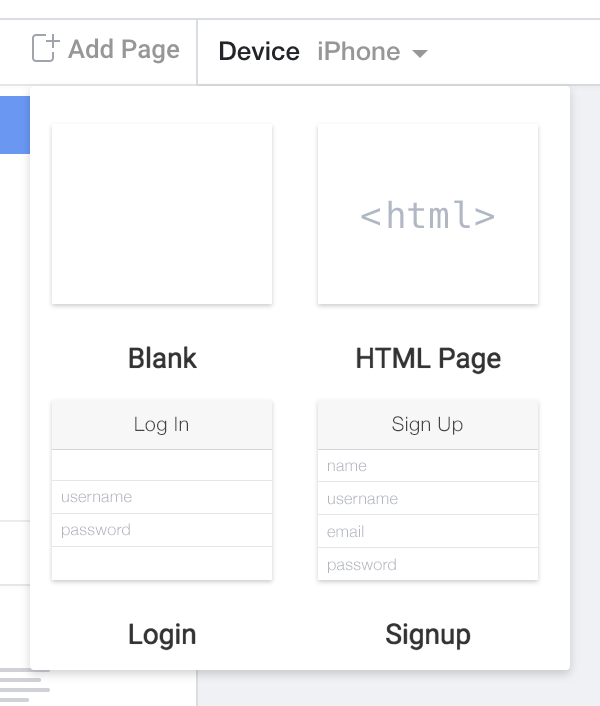
The second option is to convert a current Drag & Drop page to an HTML Page by clicking on "Convert to HTML" in the Page's properties at the bottom of the Miscellaneous section.

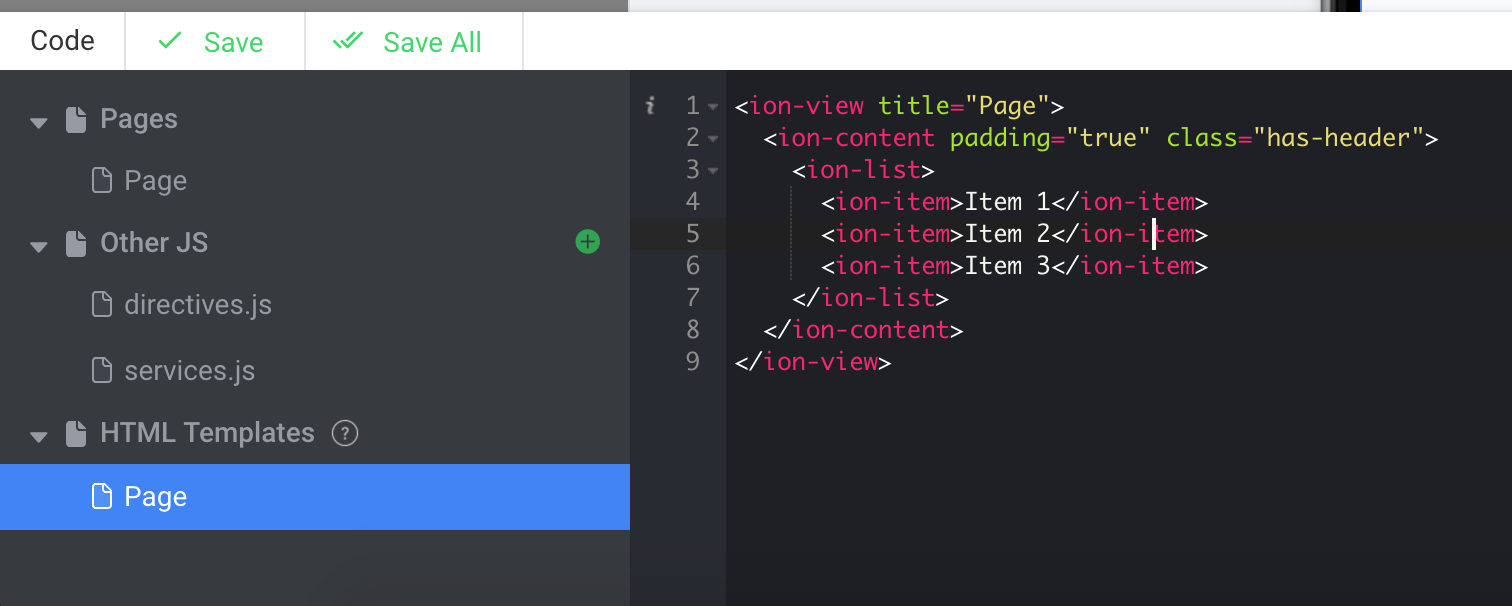
Once a page is converted to HTML, you can access that pages template through the code bar at the bottom of your page. Each HTML Page will have a file in the "HTML Templates" section that is named the same as the page.
We also recorded a video that shows you how you can use HTML Pages to add Buttons to Headers (please note that this functionality is now built into Pages, so it's not completely necessary) and how to set up a complex grid layout on your page.
7:11

2:30
Using ui-sref to Navigate in HTML
When you are working with the HTML Component or HTML based Pages, you may find yourself wanting to link to a different page of your app. In order to do this, you can either use $state.go in your page JavaScript or you can use the ui-sref directive.
When using ui-sref you are going to need the State/sref of the page that you're wanting to navigate to.This can be found in the Title section of your Page properties.
For simple navigation, you can just add ui-sref and set it to the State of the page you want to go to:
<a ui-sref="tabsController.results" class="button button-balanced button-block">Find Matching Surveys</a>
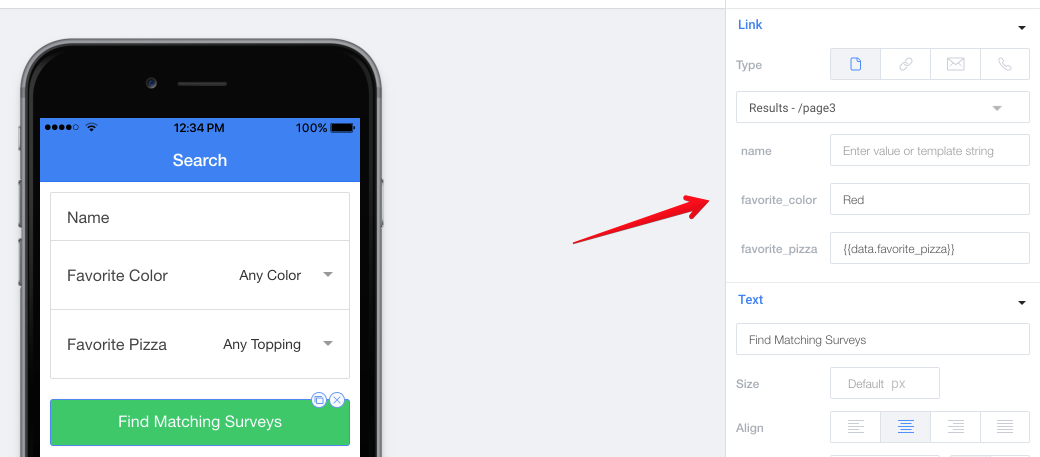
If you need to also pass Route Parameters, you can do that by turning the State of the page into a function and passing them as parameters:
<a ui-sref="tabsController.results({'favorite_color': 'Red', 'favorite_pizza': data.favorite_pizza})" class="button button-balanced button-block">Find Matching Surveys</a>
No comments:
Post a Comment